 |
-
From Sunny North Lincolnshire uk
-
World Time Clock
|
|
|
|
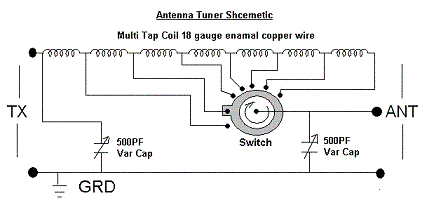
Below is a basic antenna tuner that can easily be built using a hand full of components and a few very basic engineering skills If you plan working all the HF (for beginners that's High Frequency) Bands 1.8 to 30 MHz with a long wire or dipole antenna you will almost certainly need to use an aerial tuner unit to get a good SWR on each band, this is also a good piece of equipment to use for short wave listeners as it will ensure your antenna is resonant at the frequency your listening on increasing signal strength's 3 or 4 points.
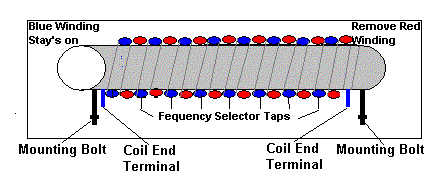
Lets start with winding the coil then, this is wound spaced 1 x 18 gauge and we do this by winding 2 coils side by side and removing 1 of the windings when the coil winding is complete, this gives even spacing over the whole length of the coil and gives a professional finish. Now cut the piece of plastic piping to fit in the aluminium box leaving a 1 inch gap at each end, drill a whole at each end of the tube about 1/2 an inch in and put two 6mm mounting bolts into the tube making sure they both point equally downward, now leaving a suitable gap of 1/8 of an inch from the mounting bolts wind the coil as follows:
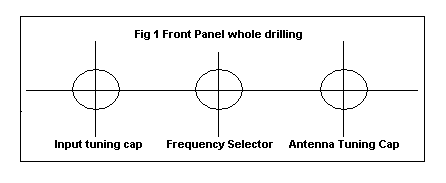
Now mark the rear wall of the aluminium case to take the coil mounting bolts, do this by offering the coil into position and making a mark where the coil mounting bolts need to be, now drill the box but do not fix the coil to the box at this time. Now Mark the Front wall of the box to mount the rotary frequency selector switch and the two tuning capacitors as shown in fig 1 (below)
Now its time to wire it all up, first connect a wire from the input PL259 socket (SO259) to the left hand coil connector, now connect another wire from the output (antenna) Pl259 (SO259) to the centre of the rotary frequency selector switch, a wire now needs to be run from both so259's to the respective tuning capacitor (input to left output to right), now to connect the coil taps to the rotary switch, run a wire from each coil tap to a switch gang, if you have chosen a rotary switch with enough gangs on it to connect every tap on the coil then all the better, if not miss out every odd tap on the coil and connect the next one (But the more taps you can connect the better), so ideally use a 1 way 12 gang switch, you should then be able to connect all the coil taps, remember to connect them in order moving along the coil and round the switch gangs. that's it your done. Testing: connect an SWR Meter to the antenna socket on the tuner and connect a 50 ohm dummy load to the antenna socket on the SWR meter. Now connect a transceiver to the input side of the tuner, and set the transceiver to its lowest power setting to avoid damage from high SWR, select a band say 80 meters first, key the radio in FM mode and note the SWR, now rotate the frequency selector switch on the tuner until the lowest SWR reading is obtained, on 80 meters this will be towards the end of the tuners coil (Most Windings), now turn each tuning capacitor until a dip in the remaining SWR is found (Best Match), this should reduce the SWR to 1.5 : 1 or less. Now do the same for each band rotating the frequency selector switch and tuning, note the switch location and capacitor setting, make a note of these and then using a template marker pen, mark the tuner front panel accordingly, that's it all done. Have fun building this project. Martin G8NQN |